How to Clean Hardwood Floors Like a Pro
Without Damaging the Finish.
I –INTRODUCTION
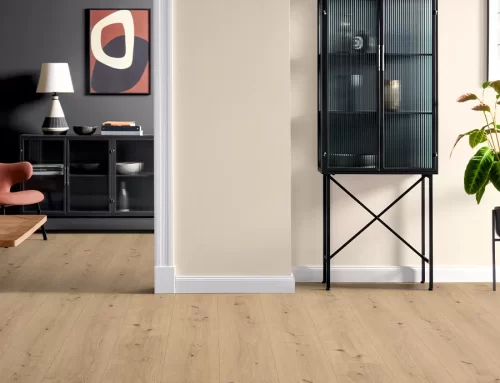
Maintaining hardwood floors properly is less about a weekend chore and more about protecting one of the most significant investments in your home. While wood is prized for its longevity—often lasting a century or more—it is a living, porous material that reacts to its environment.
When a homeowner neglects proper cleaning or uses the wrong methods, they aren’t just leaving a bit of dust; they are inadvertently accelerating the physical breakdown of the wood and its protective finish.


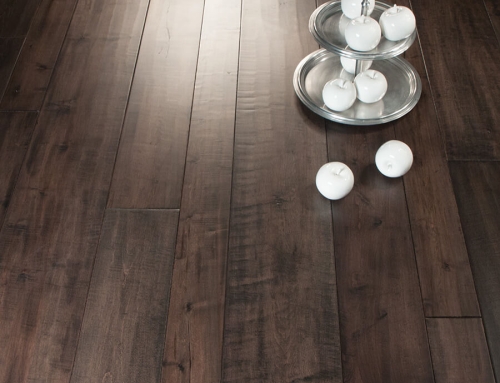
The primary enemy of a hardwood floor is grit. Microscopic particles of dirt, sand, and debris act like sandpaper under the pressure of footsteps. Over time, walking on an uncleaned floor grinds these abrasives into the polyurethane or oil finish, microscopic scratch by microscopic scratch. This eventually dulls the floor’s natural glow and, more importantly, thins the protective barrier. Once that barrier is compromised, the raw wood becomes vulnerable to permanent staining and “graying” that cannot be mopped away.


Moisture management is the other critical pillar of proper care. Many homeowners mistakenly treat hardwood like tile, using soaking wet mops or steam cleaners. This is a recipe for disaster. Excessive water can seep into the seams between planks, causing the wood to swell, cup, or crown. Even worse, steam cleaners can force moisture deep into the grain and dissolve the adhesives in engineered wood, leading to structural failure and rot that can cost thousands of dollars to repair. Proper cleaning involves using only a slightly damp microfiber cloth and pH-neutral cleaners that lift grime without saturating the wood.
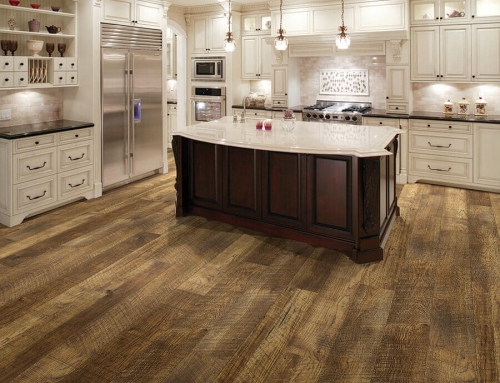
Beyond the physical health of the planks, proper cleaning is a matter of financial wisdom. Real estate data consistently shows that well-maintained hardwood floors can increase a home’s resale value by as much as 3% to 5%. Potential buyers view pristine wood floors as a premium feature that suggests the entire home has been meticulously cared for. Conversely, floors that are warped, scratched, or hazy from improper chemical use can become a major point of contention during a sale, often forcing the seller to pay for expensive professional refinishing to secure an offer.
Finally, the importance of proper cleaning extends to the health of the people living on those floors. Unlike carpet, which acts as a trap for dust mites, pet dander, and pollen, hardwood provides a smooth surface where allergens can be easily removed. However, if the cleaning is done incorrectly—for instance, using a vacuum with a stiff beater bar that kicks dust into the air—those benefits are lost. By using a vacuum with a dedicated hard-floor setting and a HEPA filter, you ensure that the air quality in your home remains high, making the living space safer for anyone with respiratory sensitivities.
II – CLEANING HARDWOOD FLOORS AS A HOMEOWNER
Cleaning hardwood floors as a homeowner is all about managing two main enemies: grit (which scratches) and moisture (which warps).
Since you’re maintaining your own home, the goal is a routine that preserves the finish so you don’t have to sand and refinish them for a long time.
1. Daily & Weekly Maintenance
-
Sweep or Vacuum (Daily/Bi-weekly): Use a soft-bristle broom or a vacuum with a hard-floor setting.
-
Critical: Never use a vacuum with a “beater bar” (the rotating brush) on, as it can leave tiny scratches that dull the shine over time.
-
-
Dust Mop (Optional): A microfiber dust mop is excellent for grabbing fine pet hair and dust that a broom might miss.

2. How to Mop (The “Damp” Method)
Mopping hardwood is different from mopping tile. You should never use a soaking wet mop.
-
The Solution: Use a pH-neutral hardwood floor cleaner (like Bona or a similar brand).
-
DIY Alternative: A few drops of dish soap in a gallon of warm water. Note that while vinegar is often suggested, its acidity can eventually dull some modern finishes, so use it sparingly (1/2 cup per gallon) if at all.
-
- The Technique: 1. Lightly mist the floor with a spray bottle or dip a microfiber mop into your solution and wring it out until it is barely damp.2. Mop in the direction of the wood grain.3. If the floor looks wet after mopping, go over it with a dry microfiber cloth immediately. Standing water can seep into the seams and cause the wood to “cup” or swell.
3. Stain Removal Guide
| Stain Type | Solution |
| Sticky Spills | Use a slightly damp cloth with a drop of dish soap; dry immediately. |
| Scuffs/Heel Marks | Rub gently with a tennis ball or a dry microfiber cloth. |
| Pet Messes | Clean immediately with a wood-safe enzymatic cleaner to prevent odors and wood rot. |
| Oil/Grease | Use a soft cloth and a tiny bit of dish soap. |
4. Things to Avoid (The “Never” List)
- No Steam Mops: The heat and high-pressure moisture can force water deep into the wood fibers, causing permanent warping and finish peeling.
- No Harsh Chemicals: Avoid bleach, ammonia, or abrasive scrubbing pads (like steel wool).
- No “Oil Soaps” or Waxes: Unless your floor specifically requires a wax finish, “oil soaps” often leave a sticky residue that attracts more dirt and makes the floor look cloudy.
5. Homeowner Protection Tips
- Felt Pads: Place them under every leg of furniture, especially chairs that move often.
- Entrance Mats: Use mats both inside and outside entryways to catch grit before it enters the house.
- Humidity Control: In very dry or very humid months, try to keep your home between 35% and 55% humidity. Wood expands and contracts, which can cause gaps or buckling.
As a homeowner, knowing which finish you have is the first step toward proper maintenance—because what cleans a polyurethane floor could actually ruin a waxed one.
III – HOMEOWNER’S DIY SPOT TEST FOR HARDWOOD FLOORING
Since you likely want to avoid damaging your floors, here are three quick DIY “spot tests” you can do in an inconspicuous area (like a corner or inside a closet) to identify your finish.
1. The Water Drop Test
This is the simplest test and usually the most revealing. Place a few drops of water on the wood and wait about 60 seconds.
✓ zolyurethane: The water will sit on top of the surface in a distinct bead.2 When you wipe it away, the wood should look exactly as it did before.
✓ Wax or Oil: The water may begin to soak in or leave a slightly dark, dull spot.3 If the water absorbs quickly, you likely have a traditional wax or penetrating oil finish.
2. The “Crayon” Rub Test
Take a clean white cloth and dampen a tiny corner with mineral spirits (or even just a dry, vigorous rub in a hidden spot).
✓ Wax: You will see a yellowish or brownish “gunk” on the cloth that feels like soft crayon or candle wax.
✓ Polyurethane: The cloth will come away clean (perhaps with some surface dust), as poly is a hardened plastic film that doesn’t rub off.
3. The Texture and Scrape Test
✓ Polyurethane: Look at the floor against the light. Poly forms a clear, continuous film that sits on top of the wood.7 If you gently (and carefully!) nick a tiny spot with a coin or fingernail, it might flake or chip like plastic.
✓ Wax/Oil: These finishes soak into the grain. You can feel the actual texture of the wood fibers more clearly. If you scrape it, you’ll get a smudge or a dull mark rather than a flake.
4. Comparison at a Glance
| Feature | Polyurethane (Surface Finish) | Wax / Oil (Penetrating Finish) |
| Appearance | Glossy to Matte “plastic” coat | Soft, natural, velvety glow |
| Feel | Smooth and “cool” | Warm; you can feel the grain |
| Maintenance | Sweep and damp mop (pH neutral) | Requires periodic buffing/re-oiling |
| Durability | High (waterproof barrier) | Lower (susceptible to water spots) |
Why it matters: If you try to apply a new coat of polyurethane over a floor that has been waxed, the new finish will peel off almost immediately.
The proper maintenance schedule is based on which finish you have.
IV – HOMEOWNER’S MAINTENANCE GUIDE FOR HARDWOOD FLOORING
Maintaining hardwood floors as a homeowner is mostly about preventing “sandpaper” wear—the tiny scratches caused by everyday dust and grit. Here is a standard maintenance schedule based on industry best practices for preserving wood finishes.
☑ THE MAINTENANCE CHECKLIST
|
Task | Purpose | |
|---|---|---|---|
| Daily | Dust mop or sweep | Removes abrasive grit and pet hair. | |
| Weekly | Vacuum (bare floor setting) | Gets dirt out of grooves and between boards. | |
| Monthly | Deep clean with wood-safe cleaner | Removes buildup and sticky residues. | |
| 3–5 Years | Professional “Screen and Recoat” | Renews the top protective layer of finish. | |
| 10–20 Years | Sand and Refinish |
|
☑ CRUCIAL DO’S and DON’TS
DO use Microfiber: A microfiber dust mop is better than a traditional broom because it uses static electricity to trap dust rather than pushing it around.
DON’T use a Beater Bar: When vacuuming, turn off the rotating “beater bar” or use a hard-floor attachment.3 The stiff bristles can dull or scratch the wood’s surface.
DO check your Cleaner: Use a pH-neutral cleaner specifically made for wood (like Bona).4 Avoid vinegar, steam mops, or wax-based cleaners, as they can strip the finish or leave a cloudy residue.
DON’T “Wet” Mop: Wood and water are enemies. Your mop should be damp to the touch, never dripping. If you see standing water, you’re using too much.
☑ HOMEOWNER “PRO TIPS” FOR LONGEVITY
Manage Humidity: Try to keep your home’s humidity between 35% and 55%.7 Too dry, and the wood shrinks (gaps appear); too humid, and it expands (boards may buckle).
Felt Pads: Place heavy-duty felt pads under all furniture legs and replace them every year, as they tend to trap grit over time.
V – CLOSING REVIEW
As a homeowner, you know that hardwood floors are often one of the most significant investments in a property.1 Properly scheduling their maintenance isn’t just about keeping them clean—it’s about preserving the structural integrity and financial value of your home.2
Here are the key advantages of staying on top of your hardwood floor maintenance:
1. Significant Financial Savings
The biggest long-term advantage is cost avoidance.
-
Preventing Sanding/Refinishing: Regular maintenance, such as “screen and recoat” (adding a top layer of finish), can postpone a full, expensive sanding and refinishing job for decades.
-
Avoiding Replacement: Extreme neglect can lead to warping or deep wood rot from moisture. Replacing a hardwood floor is many times more expensive than the cost of annual professional cleanings or routine polishing.
2. Enhanced Property Value and “Turn-Key” Appeal
If you ever decide to sell, well-maintained hardwood floors are a major selling point.
-
High ROI: Refinishing or maintaining hardwood floors has been shown to have a return on investment (ROI) as high as 147%.
-
Buyer Confidence: Pristine floors signal to potential buyers that the rest of the home has also been meticulously cared for, often leading to faster sales and higher offers.
3. Protection Against “Sandpaper Effect”
Daily life brings in grit, sand, and dirt. Without regular sweeping or vacuuming (with the correct bare-floor attachment):
-
Micro-abrasions: Walking on these particles acts like sandpaper, slowly grinding away the protective polyurethane or oil finish.
-
Dullness: Once the finish is worn down, the floor loses its luster and becomes “thirsty,” making it more susceptible to stains and water damage.
4. Improved Indoor Air Quality and Health
Unlike carpet, which traps dust, pollen, and pet dander, hardwood is naturally hypoallergenic.
-
Allergen Control: Regular maintenance ensures that allergens are actually removed from the home rather than being ground into fibers.
-
Eco-Friendly: Using scheduled maintenance often involves using pH-neutral, low-VOC (Volatile Organic Compounds) cleaners, which keep your home’s air safer than the heavy chemicals used in deep restorative repairs.
5. Recommended Maintenance Schedule for Homeowners
Pro Tip: As a homeowner, one of the simplest things you can do is check the felt pads on the bottom of your furniture every few months. Replacing worn pads is the cheapest way to prevent deep gouges.


|
Task | Purpose | |
|---|---|---|---|
| Daily | Dust mop or sweep | Removes abrasive grit and pet hair. | |
| Weekly | Vacuum (bare floor setting) | Gets dirt out of grooves and between boards. | |
| Monthly | Deep clean with wood-safe cleaner | Removes buildup and sticky residues. | |
| 3–5 Years | Professional “Screen and Recoat” | Renews the top protective layer of finish. | |
| 10–20 Years | Sand and Refinish |
|